Sidebar

mind broadcasting
Open menu
  • thinking seriously is revolution
  • αρχική
  • επαφές
  • About

PostgreSQL

Move a PostgreSQL Data Directory to a New Location on Ubuntu 16.04

How To Move a PostgreSQL Data Directory to a New Location on Ubuntu 16.04

Introduction

Databases grow over time, sometimes outgrowing the space on their original file system. You can also run into I/O contention when they’re located on the same partition as the rest of the operating system. RAID, network block storage, and other devices can offer redundancy and other desirable features. Whether you’re adding more space, evaluating ways to optimize performance, or looking to take advantage of other storage features, this tutorial will guide you through relocating PostgreSQL’s data directory.

 
Step 1 — Moving the PostgreSQL Data Directory

To prepare for moving PostgreSQL’s data directory, let’s verify the current location by starting an interactive PostgreSQL session. In the line below, psql is the command to enter the interactive monitor, and -u postgres tells sudo to execute psql as the system's postgres user:

  • sudo -u postgres psql

Once you've entered the monitor, select the data directory:

  • SHOW data_directory;
Output
       data_directory       
------------------------------
/var/lib/postgresql/9.5/main
(1 row)

This output confirms that PostgreSQL is configured to use the default data directory, /var/lib/postgresql/9.5/main, so that’s the directory we need to move. Once you've confirmed the directory on your system, type \q to quit.

To ensure the integrity of the data, we’ll shut down PostgreSQL before we actually make changes to the data directory:

  • sudo systemctl stop postgresql

systemctl doesn't display the outcome of all service management commands. To verify you’ve succeeded, use the following command:

  • sudo systemctl status postgresql

You can confirm it’s shut down if the final line of the output tells you the server is stopped:

Output
. . .
Jul 22 16:22:44 ubuntu-512mb-nyc1-01 systemd[1]: Stopped PostgreSQL RDBMS.

Now that the server is shut down, we’ll copy the existing database directory to the new location with rsync. Using the -a flag preserves the permissions and other directory properties while -v provides verbose output so you can follow the progress.

Note: Be sure there is no trailing slash on the directory, which may be added if you use tab completion. When there’s a trailing slash, rsync will dump the contents of the directory into the mount point instead of transferring it into a containing PostgreSQL directory:

We’re going to start the rsync from the postgresql directory in order to mimic the original directory structure in our new location. By creating that postgresql directory within the mount-point directory and retaining ownership by the PostgreSQL user, we can avoid permissions problems for future upgrades. The version directory, 9.5 isn’t strictly necessary since we’ve defined the location explicitly in the postgresql.conf file, but following the project convention certainly won’t hurt, especially if there’s a need in the future to run multiple versions of PostgreSQL.

  • sudo rsync -av /var/lib/postgresql /mnt/volume-nyc1-01

Once the copy is complete, we'll rename the current folder with a .bak extension and keep it until we’ve confirmed the move was successful. By re-naming it, we’ll avoid confusion that could arise from files in both the new and the old location:

  • sudo mv /var/lib/postgresql/9.5/main /var/lib/postgresql/9.5/main.bak

Now we’re ready to turn our attention to configuration.

Step 2 — Pointing to the New Data Location

PostgreSQL has several ways to override configuration values. By default, the data_directory is set to /var/lib/postgresql/9.5/main in the /etc/postgresql/9.5/main/postgresql.conf file. Edit this file to reflect the new data directory:

  • sudo nano /etc/postgresql/9.5/main/postgresql.conf

Find the line that begins with data_directory and change the path which follows to reflect the new location.

In our case, the updated file looks like the output below:

/etc/postgresql/9.5/main/postgresql.conf
. . .
data_directory = '/mnt/volume-nyc1-01/postgresql/9.5/main'
. . .

Step 3 — Restarting PostgreSQL

We're ready to start PostgreSQL.

  • sudo systemctl start postgresql


  • sudo systemctl status postgresql

To make sure that the new data directory is indeed in use, start the PostgreSQL monitor.

  • sudo -u postgres psql

Look at the value for the data directory again:

  • SHOW data_directory;
Output
            data_directory
-----------------------------------------
/mnt/volume-nyc1-01/postgresql/9.5/main
(1 row)

Now that you’ve restarted PostgreSQL and confirmed that it’s using the new location, take the opportunity to ensure that your database is fully functional. Once you’ve verified the integrity of any existing data, you can remove the backup data directory:

  • sudo rm -Rf /var/lib/postgresql/9.5/main.bak

Restart PostgreSQL one final time to be sure that it works as expected:

  • sudo systemctl restart postgresql
  • sudo systemctl status postgresql


install postgreSQL 9.6 on fresh ubuntu installation

How to install PostgreSQL and PostGIS 2.3 on Ubuntu 16.04 LTS

For all following commands use your terminal.

At firtst you need a working PostgreSQL DBMS. By default Ubuntu 16.04 (Xenial) comes with PostgreSQL 9.5 in its repositories.
As you want to install current version 9.6 you have to add the official PostgreSQL Apt Repository to your sources.list:


sudo add-apt-repository "deb http://apt.postgresql.org/pub/repos/apt/ xenial-pgdg main"

Import the relevant signing key:

wget --quiet -O - https://www.postgresql.org/media/keys/ACCC4CF8.asc | sudo apt-key add -


Update your packages:

sudo apt update
Start installing PostgreSQL 9.6 and the “contrib” package to add additional utilities and functionality to the database:

sudo apt install postgresql-9.6 postgresql-contrib-9.6
Check your PostgreSQL Version:

psql --version
The output should look somehow like this:

psql (PostgreSQL) 9.6.2
Create a new database user(replace “user-name” with your name):

sudo -u postgres createuser -Puser-name
You will be prompted for a password. As always: Use a strong password here!

Create a new database (replace “user-name” with your username and “gistest” with whatever you want to name your database):

sudo -u postgres createdb -O user-name  gistest
Test if your database works correctly:

psql -h localhost -Uuser-name gistest
As an output you should see something like this:

psql (9.6.2)
SSL connection (protocol: TLSv1.2, cipher: ECDHE-RSA-AES256-GCM-SHA384, bits: 256, compression: off)
Type "help" for help.

gistest=>

Exit psql:

\q
Now, let’s add PostGIS support to your database:

Add UbuntuGIS-unstable repository and update packages:

sudo add-apt-repository ppa:ubuntugis/ubuntugis-unstable
sudo apt update
Install PostGIS:

sudo apt install postgis postgresql-9.6-postgis-2.3
Create extensions for your postgres database:

sudo -u postgres psql -c "CREATE EXTENSION postgis; CREATE EXTENSION postgis_topology;" gisdata


Next part: PostGIS running on Ubuntu and how to use it on a client computer


This can be the same computer your database is running on (here Ubuntu 16.04)
or any remote PC with Linux or Windows…

First we need to install the Postgres Adminpack on our server system.
It provides a number of support functions which pgAdmin3 and other administration
tools can use to give additional functionality.

sudo -u postgres psql
CREATE EXTENSION adminpack;

Now we edit the config files of PostgreSQL to open access to external clients.

cd /etc/postgresql/9.6/main

sudo nano pg_hba.conf
Instead of vim you could use whatever editor you prefer.
Let’s go to the end of the document and add the following line under # IPv4 local connections:

host       all      all          x.x.x.0/24        trust

This will allow all users with a password to connect from remote. You could set whatever
IP range you want to have here (e.g. for safety reasons your local network).

you can add another local network or a single IP as well.
ow we edit postgresql.conf and change listen_addresses line to a specific IP of the server or ‘*’ to listen on all IPs:

sudo nano posgresql.conf

find the line containing "listen_addresses" and change it as follows:

#------------------------------------------------------------------------------
# CONNECTIONS AND AUTHENTICATION
#------------------------------------------------------------------------------

# - Connection Settings -

# listen_addresses = 'localhost'           # what IP address(es) to listen on;
                                                             # comma-separated list of addresses;
listen_addresses = '*'

                                                             # defaults to 'localhost'; use '*' for all
# (change requires restart)
port = 5432                                          # (change requires restart)
max_connections = 100                      # (change requires restart)


listen_addresses = '*'      witch means that postgreSQL is listening all the network

change also the port if you want. Default value is 5432


Save it in your editor (in nano CTRL & O) and exit (in nano CTRL & X)
Do a service restart:
sudo service postgresql restart

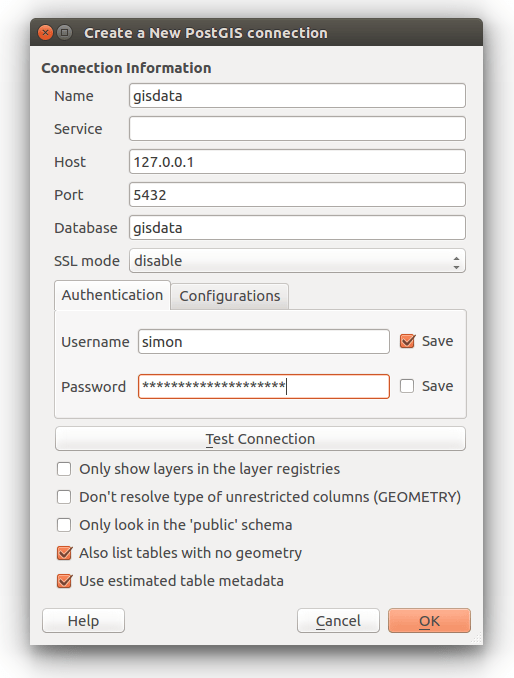
Now we are ready to add the database in QGIS: In the Browser panel right-click on PostGIS and open “New Connection…”.


Fill in your connection information:


implementation by noisyjohn

Log in

remember, curiosity kills the cat ...

  • Forgot your password?

bye bye ..

inspire example
facebook_page_plugin
geofiles pool
inspire pool
inspire site
Bootstrap is a front-end framework of Twitter, Inc. Code licensed under MIT License. Font Awesome font licensed under SIL OFL 1.1.