How to install PostgreSQL and PostGIS 2.3 on Ubuntu 16.04 LTS
For all following commands use your terminal.
At firtst you need a working PostgreSQL DBMS. By default Ubuntu 16.04 (Xenial) comes with PostgreSQL 9.5 in its repositories.
As you want to install current version 9.6 you have to add the official PostgreSQL Apt Repository to your sources.list:
sudo add-apt-repository "deb http://apt.postgresql.org/pub/repos/apt/ xenial-pgdg main"
Import the relevant signing key:
wget --quiet -O - https://www.postgresql.org/media/keys/ACCC4CF8.asc | sudo apt-key add -
Update your packages:
sudo apt update
Start installing PostgreSQL 9.6 and the “contrib” package to add additional utilities and functionality to the database:
sudo apt install postgresql-9.6 postgresql-contrib-9.6
Check your PostgreSQL Version:
psql --version
The output should look somehow like this:
psql (PostgreSQL) 9.6.2
Create a new database user(replace “user-name” with your name):
sudo -u postgres createuser -Puser-name
You will be prompted for a password. As always: Use a strong password here!
Create a new database (replace “user-name” with your username and “gistest” with whatever you want to name your database):
sudo -u postgres createdb -O user-name gistest
Test if your database works correctly:
psql -h localhost -Uuser-name gistest
As an output you should see something like this:
psql (9.6.2)
SSL connection (protocol: TLSv1.2, cipher: ECDHE-RSA-AES256-GCM-SHA384, bits: 256, compression: off)
Type "help" for help.
gistest=>
Exit psql:
\q
Now, let’s add PostGIS support to your database:
Add UbuntuGIS-unstable repository and update packages:
sudo add-apt-repository ppa:ubuntugis/ubuntugis-unstable
sudo apt update
Install PostGIS:
sudo apt install postgis postgresql-9.6-postgis-2.3
Create extensions for your postgres database:
sudo -u postgres psql -c "CREATE EXTENSION postgis; CREATE EXTENSION postgis_topology;" gisdata
Next part: PostGIS running on Ubuntu and how to use it on a client computer
This can be the same computer your database is running on (here Ubuntu 16.04)
or any remote PC with Linux or Windows…
First we need to install the Postgres Adminpack on our server system.
It provides a number of support functions which pgAdmin3 and other administration
tools can use to give additional functionality.
sudo -u postgres psql
CREATE EXTENSION adminpack;
Now we edit the config files of PostgreSQL to open access to external clients.
cd /etc/postgresql/9.6/main
sudo nano pg_hba.conf
Instead of vim you could use whatever editor you prefer.
Let’s go to the end of the document and add the following line under # IPv4 local connections:
host all all x.x.x.0/24 trust
This will allow all users with a password to connect from remote. You could set whatever
IP range you want to have here (e.g. for safety reasons your local network).
you can add another local network or a single IP as well.
ow we edit postgresql.conf and change listen_addresses line to a specific IP of the server or ‘*’ to listen on all IPs:
sudo nano posgresql.conf
find the line containing "listen_addresses" and change it as follows:
#------------------------------------------------------------------------------
# CONNECTIONS AND AUTHENTICATION
#------------------------------------------------------------------------------
# - Connection Settings -
# listen_addresses = 'localhost' # what IP address(es) to listen on;
# comma-separated list of addresses;
listen_addresses = '*'
# defaults to 'localhost'; use '*' for all
# (change requires restart)
port = 5432 # (change requires restart)
max_connections = 100 # (change requires restart)
listen_addresses = '*' witch means that postgreSQL is listening all the network
change also the port if you want. Default value is 5432
Save it in your editor (in nano CTRL & O) and exit (in nano CTRL & X)
Do a service restart:
sudo service postgresql restart
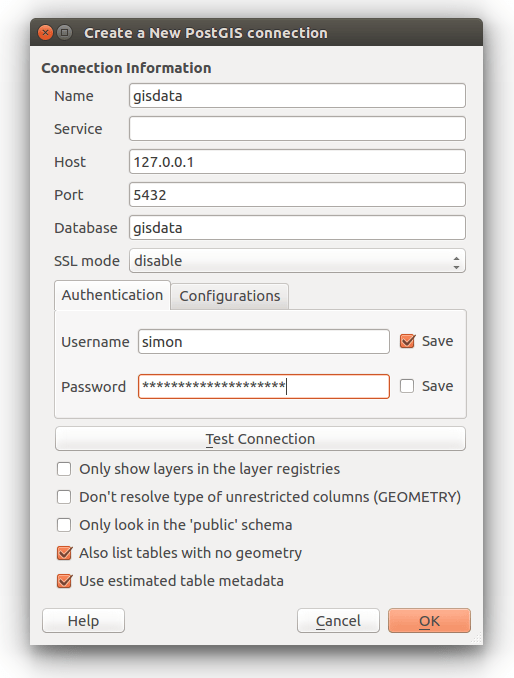
Now we are ready to add the database in QGIS: In the Browser panel right-click on PostGIS and open “New Connection…”.
Fill in your connection information: