Maximenu CK message : Your module is still working in V8 Legacy mode. Please change it in the Advanced options to remove this message.
  το site προορίζεται γα τεχνικούς της πληροφορικής, που συμμετέχουν στην ενημέρωσή του. Δεν υπάρχει δυνατότητα εγγραφής νέων μελών. Σκοπός του είναι η συλλογή θεμάτων που αφορούν την εγκατάσταση και ρύθμιση εφαρμογών  καθώς και επίλυση διαφόρων προβλημάτων. Δεν περιέχει γενικά άρθρα ή πληροφορία.  

AppArmor

AppArmor

is a Linux Security Module implementation of name-based mandatory access controls. AppArmor confines individual programs to a set of listed files and posix 1003.1e draft capabilities. AppArmor is installed and loaded by default. It uses profiles of an application to determine what files and permissions the application requires. Some packages will install their own profiles, and additional profiles can be found in the apparmor-profiles package.

To install the apparmor-profiles package from a terminal prompt:

sudo apt install apparmor-profiles
AppArmor profiles have two modes of execution:

Complaining/Learning: profile violations are permitted and logged. Useful for testing and developing new profiles.

Enforced/Confined: enforces profile policy as well as logging the violation.

Using AppArmor
Profiles
References
Using AppArmor
This section is plagued by a bug (LP #1304134) and instructions will not work as advertised.

The apparmor-utils package contains command line utilities that you can use to change the AppArmor execution mode, find the status of a profile, create new profiles, etc.

apparmor_status is used to view the current status of AppArmor profiles.

sudo apparmor_status
aa-complain places a profile into complain mode.

sudo aa-complain /path/to/bin
aa-enforce places a profile into enforce mode.

sudo aa-enforce /path/to/bin
The /etc/apparmor.d directory is where the AppArmor profiles are located. It can be used to manipulate the mode of all profiles.

Enter the following to place all profiles into complain mode:

sudo aa-complain /etc/apparmor.d/*
To place all profiles in enforce mode:

sudo aa-enforce /etc/apparmor.d/*
apparmor_parser is used to load a profile into the kernel. It can also be used to reload a currently loaded profile using the -r option. To load a profile:

cat /etc/apparmor.d/profile.name | sudo apparmor_parser -a
To reload a profile:

cat /etc/apparmor.d/profile.name | sudo apparmor_parser -r
systemctl can be used to reload all profiles:

sudo systemctl reload apparmor.service
The /etc/apparmor.d/disable directory can be used along with the apparmor_parser -R option to disable a profile.

sudo ln -s /etc/apparmor.d/profile.name /etc/apparmor.d/disable/
sudo apparmor_parser -R /etc/apparmor.d/profile.name
To re-enable a disabled profile remove the symbolic link to the profile in /etc/apparmor.d/disable/. Then load the profile using the -a option.

sudo rm /etc/apparmor.d/disable/profile.name
cat /etc/apparmor.d/profile.name | sudo apparmor_parser -a
AppArmor can be disabled, and the kernel module unloaded by entering the following:

sudo systemctl stop apparmor.service
sudo update-rc.d -f apparmor remove
To re-enable AppArmor enter:

sudo systemctl start apparmor.service
sudo update-rc.d apparmor defaults
Replace profile.name with the name of the profile you want to manipulate. Also, replace /path/to/bin/ with the actual executable file path. For example for the ping command use /bin/ping

Profiles
AppArmor profiles are simple text files located in /etc/apparmor.d/. The files are named after the full path to the executable they profile replacing the "/" with ".". For example /etc/apparmor.d/bin.ping is the AppArmor profile for the /bin/ping command.

There are two main type of rules used in profiles:

Path entries: detail which files an application can access in the file system.

Capability entries: determine what privileges a confined process is allowed to use.

As an example, take a look at /etc/apparmor.d/bin.ping:

#include
/bin/ping flags=(complain) {
#include
#include
#include

capability net_raw,
capability setuid,
network inet raw,

/bin/ping mixr,
/etc/modules.conf r,
}
#include : include statements from other files. This allows statements pertaining to multiple applications to be placed in a common file.

/bin/ping flags=(complain): path to the profiled program, also setting the mode to complain.

capability net_raw,: allows the application access to the CAP_NET_RAW Posix.1e capability.

/bin/ping mixr,: allows the application read and execute access to the file.

After editing a profile file the profile must be reloaded. See Using AppArmor for details.

Creating a Profile
Design a test plan: Try to think about how the application should be exercised. The test plan should be divided into small test cases. Each test case should have a small description and list the steps to follow.

Some standard test cases are:

Starting the program.

Stopping the program.

Reloading the program.

Testing all the commands supported by the init script.

Generate the new profile: Use aa-genprof to generate a new profile. From a terminal:

sudo aa-genprof executable
For example:

sudo aa-genprof slapd
To get your new profile included in the apparmor-profiles package, file a bug in Launchpad against the AppArmor package:

Include your test plan and test cases.

Attach your new profile to the bug.

Updating Profiles
When the program is misbehaving, audit messages are sent to the log files. The program aa-logprof can be used to scan log files for AppArmor audit messages, review them and update the profiles. From a terminal:

sudo aa-logprof

Tomcat installation on Ubuntu 16.04

How To Install Apache Tomcat 8 on Ubuntu 16.04
 

Introduction

Apache Tomcat is a web server and servlet container that is used to serve Java applications. Tomcat is an open source implementation of the Java Servlet and JavaServer Pages technologies, released by the Apache Software Foundation. This tutorial covers the basic installation and some configuration of the latest release of Tomcat 8 on your Ubuntu 16.04 server.


Prerequisites

Before you begin with this guide, you should have a non-root user with sudo privileges set up on your server. You can learn how to do this by completing our Ubuntu 16.04 initial server setup guide.


Step 1: Install Java

Tomcat requires Java to be installed on the server so that any Java web application code can be executed. We can satisfy that requirement by installing OpenJDK with apt-get.

First, update your apt-get package index:

  • sudo apt-get update

Then install the Java Development Kit package with apt-get:

  • sudo apt-get install default-jdk

Now that Java is installed, we can create a tomcat user, which will be used to run the Tomcat service.

Step 2: Create Tomcat User

For security purposes, Tomcat should be run as an unprivileged user (i.e. not root). We will create a new user and group that will run the Tomcat service.

First, create a new tomcat group:

  • sudo groupadd tomcat

Next, create a new tomcat user. We'll make this user a member of the tomcat group, with a home directory of /opt/tomcat (where we will install Tomcat), and with a shell of /bin/false (so nobody can log into the account):

  • sudo useradd -s /bin/false -g tomcat -d /opt/tomcat tomcat

Now that our tomcat user is set up, let's download and install Tomcat.


Step 3: Install Tomcat

The best way to install Tomcat 8 is to download the latest binary release then configure it manually.

Find the latest version of Tomcat 8 at the Tomcat 8 Downloads page. At the time of writing, the latest version is 8.5.5, but you should use a later stable version if it is available. Under the Binary Distributionssection, then under the Core list, copy the link to the "tar.gz".

Next, change to the /tmp directory on your server. This is a good directory to download ephemeral items, like the Tomcat tarball, which we won't need after extracting the Tomcat contents:

  • cd /tmp

Use curl to download the link that you copied from the Tomcat website:

  • curl -O http://apache.mirrors.ionfish.org/tomcat/tomcat-8/v8.5.5/bin/apache-tomcat-8.5.5.tar.gz

We will install Tomcat to the /opt/tomcat directory. Create the directory, then extract the archive to it with these commands:

  • sudo mkdir /opt/tomcat
  • sudo tar xzvf apache-tomcat-8*tar.gz -C /opt/tomcat --strip-components=1

Next, we can set up the proper user permissions for our installation.


Step 4: Update Permissions

The tomcat user that we set up needs to have access to the Tomcat installation. We'll set that up now.

Change to the directory where we unpacked the Tomcat installation:

  • cd /opt/tomcat

Give the tomcat group ownership over the entire installation directory:

  • sudo chgrp -R tomcat /opt/tomcat

Next, give the tomcat group read access to the conf directory and all of its contents, and execute access to the directory itself:

  • sudo chmod -R g+r conf
  • sudo chmod g+x conf

Make the tomcat user the owner of the webappsworktemp, and logs directories:

  • sudo chown -R tomcat webapps/ work/ temp/ logs/

Now that the proper permissions are set up, we can create a systemd service file to manage the Tomcat process.

Step 5: Create a systemd Service File

We want to be able to run Tomcat as a service, so we will set up systemd service file.

Tomcat needs to know where Java is installed. This path is commonly referred to as "JAVA_HOME". The easiest way to look up that location is by running this command:

  • sudo update-java-alternatives -l
Output
java-1.8.0-openjdk-amd64       1081       /usr/lib/jvm/java-1.8.0-openjdk-amd64

The correct JAVA_HOME variable can be constructed by taking the output from the last column (highlighted in red) and appending /jre to the end. Given the example above, the correct JAVA_HOME for this server would be:

JAVA_HOME
/usr/lib/jvm/java-1.8.0-openjdk-amd64/jre

Your JAVA_HOME may be different.

With this piece of information, we can create the systemd service file. Open a file called tomcat.servicein the /etc/systemd/system directory by typing:

  • sudo nano /etc/systemd/system/tomcat.service

Paste the following contents into your service file. Modify the value of JAVA_HOME if necessary to match the value you found on your system. You may also want to modify the memory allocation settings that are specified in CATALINA_OPTS:

/etc/systemd/system/tomcat.service
[Unit]
Description=Apache Tomcat Web Application Container
After=network.target

[Service]
Type=forking

Environment=JAVA_HOME=/usr/lib/jvm/java-1.8.0-openjdk-amd64/jre
Environment=CATALINA_PID=/opt/tomcat/temp/tomcat.pid
Environment=CATALINA_HOME=/opt/tomcat
Environment=CATALINA_BASE=/opt/tomcat
Environment='CATALINA_OPTS=-Xms512M -Xmx1024M -server -XX:+UseParallelGC'
Environment='JAVA_OPTS=-Djava.awt.headless=true -Djava.security.egd=file:/dev/./urandom'

ExecStart=/opt/tomcat/bin/startup.sh
ExecStop=/opt/tomcat/bin/shutdown.sh

User=tomcat
Group=tomcat
UMask=0007
RestartSec=10
Restart=always

[Install]
WantedBy=multi-user.target

When you are finished, save and close the file.

Next, reload the systemd daemon so that it knows about our service file:

  • sudo systemctl daemon-reload

Start the Tomcat service by typing:

  • sudo systemctl start tomcat

Double check that it started without errors by typing:

  • sudo systemctl status tomcat

Step 6: Adjust the Firewall and Test the Tomcat Server

Now that the Tomcat service is started, we can test to make sure the default page is available.

Before we do that, we need to adjust the firewall to allow our requests to get to the service. If you followed the prerequisites, you will have a ufw firewall enabled currently.

Tomcat uses port 8080 to accept conventional requests. Allow traffic to that port by typing:

  • sudo ufw allow 8080

With the firewall modified, you can access the default splash page by going to your domain or IP address followed by :8080 in a web browser:

Open in web browser
http://server_domain_or_IP:8080

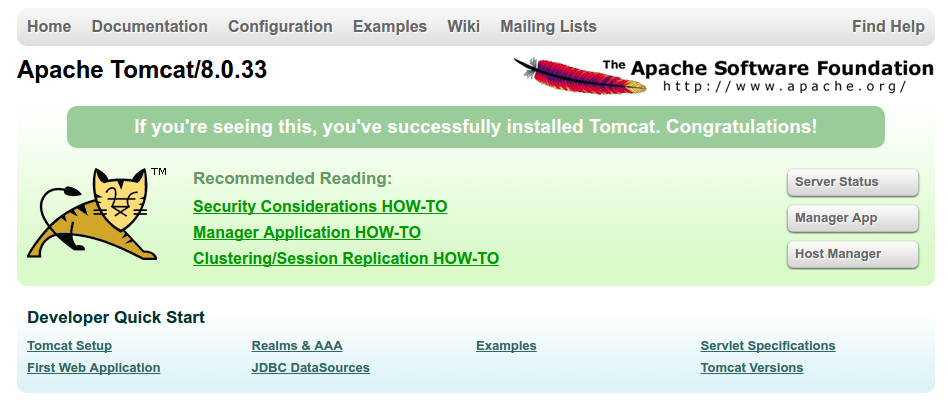
You will see the default Tomcat splash page, in addition to other information. However, if you click the links for the Manager App, for instance, you will be denied access. We can configure that access next.

If you were able to successfully accessed Tomcat, now is a good time to enable the service file so that Tomcat automatically starts at boot:

  • sudo systemctl enable tomcat

Step 7: Configure Tomcat Web Management Interface

In order to use the manager web app that comes with Tomcat, we must add a login to our Tomcat server. We will do this by editing the tomcat-users.xml file:

  • sudo nano /opt/tomcat/conf/tomcat-users.xml

You will want to add a user who can access the manager-gui and admin-gui (web apps that come with Tomcat). You can do so by defining a user, similar to the example below, between the tomcat-users tags. Be sure to change the username and password to something secure:

tomcat-users.xml — Admin User
<tomcat-users . . .>
    <user username="admin" password="password" roles="manager-gui,admin-gui"/>
</tomcat-users>

Save and close the file when you are finished.

By default, newer versions of Tomcat restrict access to the Manager and Host Manager apps to connections coming from the server itself. Since we are installing on a remote machine, you will probably want to remove or alter this restriction. To change the IP address restrictions on these, open the appropriate context.xml files.

For the Manager app, type:

  • sudo nano /opt/tomcat/webapps/manager/META-INF/context.xml

For the Host Manager app, type:

  • sudo nano /opt/tomcat/webapps/host-manager/META-INF/context.xml

Inside, comment out the IP address restriction to allow connections from anywhere. Alternatively, if you would like to allow access only to connections coming from your own IP address, you can add your public IP address to the list:

context.xml files for Tomcat webapps
<Context antiResourceLocking="false" privileged="true" >
  <!--<Valve className="org.apache.catalina.valves.RemoteAddrValve"
         allow="127\.\d+\.\d+\.\d+|::1|0:0:0:0:0:0:0:1" />-->
</Context>

Save and close the files when you are finished.

To put our changes into effect, restart the Tomcat service:

  • sudo systemctl restart tomcat
 
Step 8: Access the Web Interface

Now that we have create a user, we can access the web management interface again in a web browser. Once again, you can get to the correct interface by entering your server's domain name or IP address followed on port 8080 in your browser:

Open in web browser
http://server_domain_or_IP:8080

Backup With Rsync and Ssh


Introduction

From the man page:

  • Rsync is a fast and extraordinarily versatile file copying tool. It can copy locally, to/from another host over any remote shell, or to/from a remote rsync daemon. It offers a large number of options that control every aspect of its behavior and permit very flexible specification of the set of files to be copied. It is famous for its delta-transfer algorithm, which reduces the amount of data sent over the network by sending only the differences between the source files and the existing files in the destination. Rsync is widely used for backups and mirroring and as an improved copy command for everyday use.

In other words, rsync is a tool for efficiently copying and backing up data from one location (the source) to another (the destination). It is efficient because it only transfers files which are different between the source and destination directories.

Rsync

Rsync is a command line utility. Users attempting to use it should be familiar with the command line (see Using the Terminal). If you prefer a graphical interface, see the Grsync section of this page.

Installation

Rsync is installed in Ubuntu by default. Be sure to check whether the following packages are installed before starting (see Installing a Package): rsync, xinetd, ssh.

Perform a Simple Backup

The simplest method for backing up over a network is to use rsync via SSH (using the -e ssh option). Alternatively, you can use the rsync daemon (see Rsync Daemon which requires much more configuration. Local backup only requires rsync and read/write access to the folders being synchronized. Below you will find examples of commands that can be used to backup in either case. It should be noted, that a network sync can be performed locally so long as the folder is shared (say by Samba) and then mounted to the machine with folder1. This process gets around having to use ssh but is less secure and should only be used in secure private networks, like at your home.


How To Install Apache Tomcat

How To Install Apache Tomcat 8 on Ubuntu 16.04


Introduction

Apache Tomcat is a web server and servlet container that is used to serve Java applications. Tomcat is an open source implementation of the Java Servlet and JavaServer Pages technologies, released by the Apache Software Foundation. This tutorial covers the basic installation and some configuration of the latest release of Tomcat 8 on your Ubuntu 16.04 server.

Prerequisites

Before you begin with this guide, you should have a non-root user with sudo privileges set up on your server. You can learn how to do this by completing our Ubuntu 16.04 initial server setup guide.

Step 1: Install Java

Tomcat requires Java to be installed on the server so that any Java web application code can be executed. We can satisfy that requirement by installing OpenJDK with apt-get.

First, update your apt-get package index:

  • sudo apt-get update

Then install the Java Development Kit package with apt-get:

  • sudo apt-get install default-jdk

Managing Java

There can be multiple Java installations on one server. You can configure which version is the default for use in the command line by using update-alternatives, which manages which symbolic links are used for different commands.

  • sudo update-alternatives --config java

The output will look something like the following. In this case, this is what the output will look like with all Java versions mentioned above installed.

Output
 
 
There are 5 choices for the alternative java (providing /usr/bin/java).

  Selection    Path                                            Priority   Status
------------------------------------------------------------
* 0            /usr/lib/jvm/java-8-openjdk-amd64/jre/bin/java   1081      auto mode
  1            /usr/lib/jvm/java-6-oracle/jre/bin/java          1         manual mode
  2            /usr/lib/jvm/java-7-oracle/jre/bin/java          2         manual mode
  3            /usr/lib/jvm/java-8-openjdk-amd64/jre/bin/java   1081      manual mode
  4            /usr/lib/jvm/java-8-oracle/jre/bin/java          3         manual mode
  5            /usr/lib/jvm/java-9-oracle/bin/java              4         manual mode

Press <enter> to keep the current choice[*], or type selection number:

You can now choose the number to use as a default. This can also be done for other Java commands, such as the compiler (javac), the documentation generator (javadoc), the JAR signing tool (jarsigner), and more. You can use the following command, filling in the command you want to customize.

  • sudo update-alternatives --config command
 

Setting the JAVA_HOME Environment Variable

Many programs, such as Java servers, use the JAVA_HOME environment variable to determine the Java installation location. To set this environment variable, we will first need to find out where Java is installed. You can do this by executing the same command as in the previous section:

  • sudo update-alternatives --config java

Copy the path from your preferred installation and then open /etc/environment using nano or your favorite text editor.

  • sudo nano /etc/environment

Now that Java is installed, we can create a tomcat user, which will be used to run the Tomcat service.

Step 2: Create Tomcat User

For security purposes, Tomcat should be run as an unprivileged user (i.e. not root). We will create a new user and group that will run the Tomcat service.

First, create a new tomcat group:

  • sudo groupadd tomcat

Next, create a new tomcat user. We'll make this user a member of the tomcat group, with a home directory of /opt/tomcat (where we will install Tomcat), and with a shell of /bin/false (so nobody can log into the account):

  • sudo useradd -s /bin/false -g tomcat -d /opt/tomcat tomcat

Now that our tomcat user is set up, let's download and install Tomcat.

Step 3: Install Tomcat

The best way to install Tomcat 8 is to download the latest binary release then configure it manually.

Find the latest version of Tomcat 8 at the Tomcat 8 Downloads page. At the time of writing, the latest version is 8.5.5, but you should use a later stable version if it is available. Under the Binary Distributionssection, then under the Core list, copy the link to the "tar.gz".

Next, change to the /tmp directory on your server. This is a good directory to download ephemeral items, like the Tomcat tarball, which we won't need after extracting the Tomcat contents:

  • cd /tmp

Use curl to download the link that you copied from the Tomcat website:

  • curl -O http://apache.mirrors.ionfish.org/tomcat/tomcat-8/v8.5.5/bin/apache-tomcat-8.5.5.tar.gz

We will install Tomcat to the /opt/tomcat directory. Create the directory, then extract the archive to it with these commands:

  • sudo mkdir /opt/tomcat
  • sudo tar xzvf apache-tomcat-8*tar.gz -C /opt/tomcat --strip-components=1

Next, we can set up the proper user permissions for our installation.

Step 4: Update Permissions

The tomcat user that we set up needs to have access to the Tomcat installation. We'll set that up now.

Change to the directory where we unpacked the Tomcat installation:

  • cd /opt/tomcat

Give the tomcat group ownership over the entire installation directory:

  • sudo chgrp -R tomcat /opt/tomcat

Next, give the tomcat group read access to the conf directory and all of its contents, and execute access to the directory itself:

  • sudo chmod -R g+r conf
  • sudo chmod g+x conf

Make the tomcat user the owner of the webappsworktemp, and logs directories:

  • sudo chown -R tomcat webapps/ work/ temp/ logs/

Now that the proper permissions are set up, we can create a systemd service file to manage the Tomcat process.

Step 5: Create a systemd Service File

We want to be able to run Tomcat as a service, so we will set up systemd service file.

Tomcat needs to know where Java is installed. This path is commonly referred to as "JAVA_HOME". The easiest way to look up that location is by running this command:

  • sudo update-java-alternatives -l
Output
java-1.8.0-openjdk-amd64       1081       /usr/lib/jvm/java-1.8.0-openjdk-amd64

The correct JAVA_HOME variable can be constructed by taking the output from the last column (highlighted in red) and appending /jre to the end. Given the example above, the correct JAVA_HOME for this server would be:

JAVA_HOME
/usr/lib/jvm/java-1.8.0-openjdk-amd64/jre

Your JAVA_HOME may be different.

With this piece of information, we can create the systemd service file. Open a file called tomcat.servicein the /etc/systemd/system directory by typing:

  • sudo nano /etc/systemd/system/tomcat.service

Paste the following contents into your service file. Modify the value of JAVA_HOME if necessary to match the value you found on your system. You may also want to modify the memory allocation settings that are specified in CATALINA_OPTS:

/etc/systemd/system/tomcat.service
[Unit]
Description=Apache Tomcat Web Application Container
After=network.target

[Service]
Type=forking

Environment=JAVA_HOME=/usr/lib/jvm/java-1.8.0-openjdk-amd64/jre
Environment=CATALINA_PID=/opt/tomcat/temp/tomcat.pid
Environment=CATALINA_HOME=/opt/tomcat
Environment=CATALINA_BASE=/opt/tomcat
Environment='CATALINA_OPTS=-Xms512M -Xmx1024M -server -XX:+UseParallelGC'
Environment='JAVA_OPTS=-Djava.awt.headless=true -Djava.security.egd=file:/dev/./urandom'

ExecStart=/opt/tomcat/bin/startup.sh
ExecStop=/opt/tomcat/bin/shutdown.sh

User=tomcat
Group=tomcat
UMask=0007
RestartSec=10
Restart=always

[Install]
WantedBy=multi-user.target

When you are finished, save and close the file.

Next, reload the systemd daemon so that it knows about our service file:

  • sudo systemctl daemon-reload

Start the Tomcat service by typing:

  • sudo systemctl start tomcat

Double check that it started without errors by typing:

  • sudo systemctl status tomcat

Step 6: Adjust the Firewall and Test the Tomcat Server

Now that the Tomcat service is started, we can test to make sure the default page is available.

Before we do that, we need to adjust the firewall to allow our requests to get to the service. If you followed the prerequisites, you will have a ufw firewall enabled currently.

Tomcat uses port 8080 to accept conventional requests. Allow traffic to that port by typing:

  • sudo ufw allow 8080

With the firewall modified, you can access the default splash page by going to your domain or IP address followed by :8080 in a web browser:

Open in web browser
http://server_domain_or_IP:8080

You will see the default Tomcat splash page, in addition to other information. However, if you click the links for the Manager App, for instance, you will be denied access. We can configure that access next.

If you were able to successfully accessed Tomcat, now is a good time to enable the service file so that Tomcat automatically starts at boot:

  • sudo systemctl enable tomcat

Step 7: Configure Tomcat Web Management Interface

In order to use the manager web app that comes with Tomcat, we must add a login to our Tomcat server. We will do this by editing the tomcat-users.xml file:

  • sudo nano /opt/tomcat/conf/tomcat-users.xml

You will want to add a user who can access the manager-gui and admin-gui (web apps that come with Tomcat). You can do so by defining a user, similar to the example below, between the tomcat-users tags. Be sure to change the username and password to something secure:

tomcat-users.xml — Admin User
<tomcat-users . . .>
    <user username="admin" password="password" roles="manager-gui,admin-gui"/>
</tomcat-users>

Save and close the file when you are finished.

By default, newer versions of Tomcat restrict access to the Manager and Host Manager apps to connections coming from the server itself. Since we are installing on a remote machine, you will probably want to remove or alter this restriction. To change the IP address restrictions on these, open the appropriate context.xml files.

For the Manager app, type:

  • sudo nano /opt/tomcat/webapps/manager/META-INF/context.xml

For the Host Manager app, type:

  • sudo nano /opt/tomcat/webapps/host-manager/META-INF/context.xml

Inside, comment out the IP address restriction to allow connections from anywhere. Alternatively, if you would like to allow access only to connections coming from your own IP address, you can add your public IP address to the list:

context.xml files for Tomcat webapps
<Context antiResourceLocking="false" privileged="true" >
  <!--<Valve className="org.apache.catalina.valves.RemoteAddrValve"
         allow="127\.\d+\.\d+\.\d+|::1|0:0:0:0:0:0:0:1" />-->
</Context>

Save and close the files when you are finished.

To put our changes into effect, restart the Tomcat service:

  • sudo systemctl restart tomcat

Step 8: Access the Web Interface

Now that we have create a user, we can access the web management interface again in a web browser. Once again, you can get to the correct interface by entering your server's domain name or IP address followed on port 8080 in your browser:

Open in web browser
http://server_domain_or_IP:8080

The page you see should be the same one you were given when you tested earlier:


Tomcat root

Let's take a look at the Manager App, accessible via the link or http://server_domain_or_IP:8080/manager/html. You will need to enter the account credentials that you added to the tomcat-users.xml file. Afterwards, you should see a page that looks like this:


Tomcat Web Application Manager

The Web Application Manager is used to manage your Java applications. You can Start, Stop, Reload, Deploy, and Undeploy here. You can also run some diagnostics on your apps (i.e. find memory leaks). Lastly, information about your server is available at the very bottom of this page.

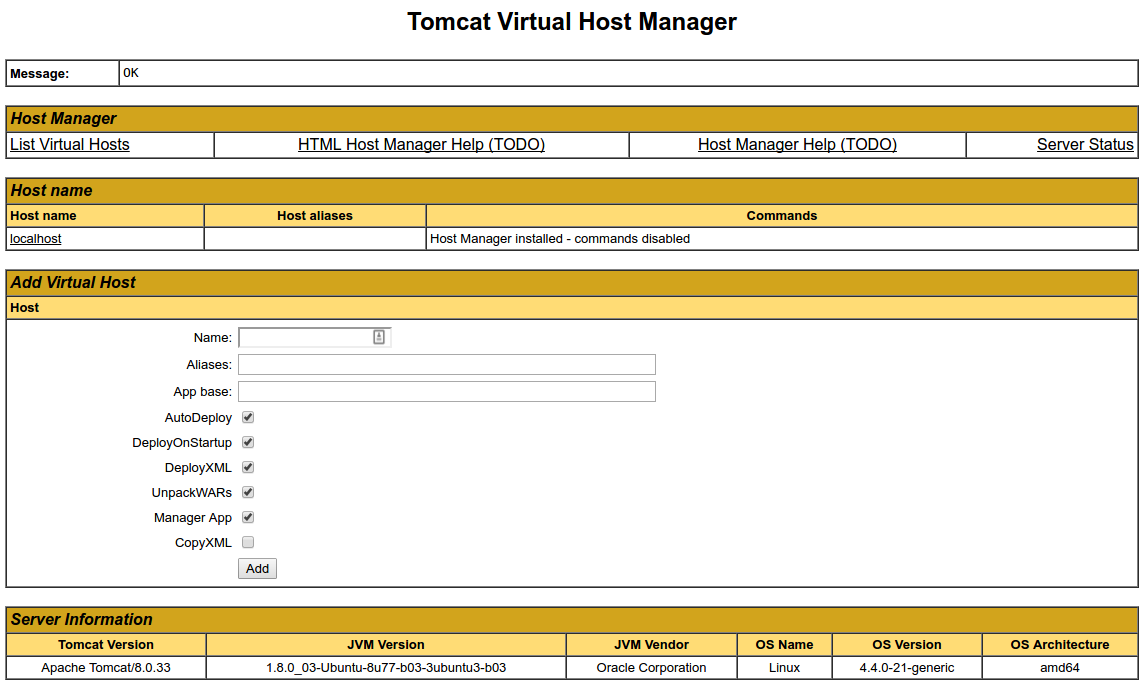
Now let's take a look at the Host Manager, accessible via the link or http://server_domain_or_IP:8080/host-manager/html/:

Tomcat Virtual Host Manager

From the Virtual Host Manager page, you can add virtual hosts to serve your applications from.

Conclusion

Your installation of Tomcat is complete! Your are now free to deploy your own Java web applications!

Currently, your Tomcat installation is functional, but entirely unencrypted. This means that all data, including sensitive items like passwords, are sent in plain text that can be intercepted and read by other parties on the internet. In order to prevent this from happening, it is strongly recommended that you encrypt your connections with SSL. You can find out how to encrypt your connections to Tomcat by following this guide.


Move MySQL Data Directory

...to a New Location on Ubuntu 16.04

Introduction

Databases grow over time, sometimes outgrowing the space on the file system. You can also run into I/O contention when they’re located on the same partition as the rest of the operating system. RAID, network block storage, and other devices can offer redundancy and other desirable features. Whether you’re adding more space, evaluating ways to optimize performance, or looking to take advantage of other storage features, this tutorial will guide you through relocating MySQL’s data directory.

Prerequisites

To complete this guide, you will need:

In this example, we’re moving the data to a block storage device mounted at /mnt/volume-nyc1-01. You can learn how to set one up in the How To Use Block Storage on DigitalOcean guide.

No matter what underlying storage you use, this guide can help you move the data directory to a new location.


Step 1 — Moving the MySQL Data Directory

To prepare for moving MySQL’s data directory, let’s verify the current location by starting an interactive MySQL session using the administrative credentials.

  • mysql -u root -p

When prompted, supply the MySQL root password. Then from the MySQL prompt, select the data directory:

  • select @@datadir;
Output
+-----------------+
| @@datadir       |
+-----------------+
| /var/lib/mysql/ |
+-----------------+
1 row in set (0.00 sec)

This output confirms that MySQL is configured to use the default data directory, /var/lib/mysql/, so that’s the directory we need to move. Once you've confirmed this, type exit to leave the monitor.

To ensure the integrity of the data, we’ll shut down MySQL before we actually make changes to the data directory:

  • sudo systemctl stop mysql

systemctl doesn't display the outcome of all service management commands, so if you want to be sure you've succeeded, use the following command:

  • sudo systemctl status mysql

You can be sure it’s shut down if the final line of the output tells you the server is stopped:

Output
. . .
Jul 18 11:24:20 ubuntu-512mb-nyc1-01 systemd[1]: Stopped MySQL Community Server.

Now that the server is shut down, we’ll copy the existing database directory to the new location with rsync. Using the -a flag preserves the permissions and other directory properties, while-v provides verbose output so you can follow the progress.

Note: Be sure there is no trailing slash on the directory, which may be added if you use tab completion. When there’s a trailing slash, rsync will dump the contents of the directory into the mount point instead of transferring it into a containing mysql directory:

  • sudo rsync -av /var/lib/mysql /mnt/volume-nyc1-01

Once the rsync is complete, rename the current folder with a .bak extension and keep it until we’ve confirmed the move was successful. By re-naming it, we’ll avoid confusion that could arise from files in both the new and the old location:

  • sudo mv /var/lib/mysql /var/lib/mysql.bak

Now we’re ready to turn our attention to configuration.

Step 2 — Pointing to the New Data Location

MySQL has several ways to override configuration values. By default, the datadir is set to /var/lib/mysql in the /etc/mysql/mysql.conf.d/mysqld.cnf file. Edit this file to reflect the new data directory:

  • sudo nano /etc/mysql/mysql.conf.d/mysqld.cnf

Find the line that begins with datadir= and change the path which follows to reflect the new location.

In our case, the updated file looks like the output below:

/etc/mysql/mysql.conf.d/mysqld.cnf
. . .
datadir=/mnt/volume-nyc1-01/mysql
. . .

This seems like the right time to bring up MySQL again, but there’s one more thing to configure before we can do that successfully.


Step 3 — Configuring AppArmor Access Control Rules

We’ll need to tell AppArmor to let MySQL write to the new directory by creating an alias between the default directory and the new location. To do this, edit the AppArmor alias file:

  • sudo nano /etc/apparmor.d/tunables/alias

At the bottom of the file, add the following alias rule:

/etc/apparmor.d/tunables/alias
. . .
alias /var/lib/mysql/ -> /mnt/volume-nyc1-01/mysql/,
. . .

For the changes to take effect, restart AppArmor:

  • sudo systemctl restart apparmor

Note: If you skipped the AppArmor configuration step, you would run into the following error message:

Output
Job for mysql.service failed because the control process 
exited with error code. See "systemctl status mysql.service" 
and "journalctl -xe" for details.

The output from both systemctl and journalctl concludes with:

Output
Jul 18 11:03:24 ubuntu-512mb-nyc1-01 systemd[1]: 
mysql.service: Main process exited, code=exited, status=1/FAILURE

Since the messages don’t make an explicit connection between AppArmor and the data directory, this error can take some time to figure out.

Step 4 — Restarting MySQL

The next step is to start MySQL, but if you do, you’ll run into another error. This time, instead of an AppArmor issue, the error happens because the script mysql-systemd-start checks for the existence of either a directory, -d, or a symbolic link, -L, that matches two default paths. It fails if they're not found:

/usr/share/mysql/mysql-systemd-start
. . .
if [ ! -d /var/lib/mysql ] && [ ! -L /var/lib/mysql ]; then
 echo "MySQL data dir not found at /var/lib/mysql. Please create one."
 exit 1
fi

if [ ! -d /var/lib/mysql/mysql ] && [ ! -L /var/lib/mysql/mysql ]; then
 echo "MySQL system database not found. Please run mysql_install_db tool."
 exit 1
fi

. . .

Since we need these to start the server, we will create the minimal directory structure to pass the script's environment check.

  • sudo mkdir /var/lib/mysql/mysql -p

Now we're ready to start MySQL.

  • sudo systemctl start mysql
  • sudo systemctl status mysql

To make sure that the new data directory is indeed in use, start the MySQL monitor.

  • mysql -u root -p

Look at the value for the data directory again:

Output
+----------------------------+
| @@datadir                  |
+----------------------------+
| /mnt/volume-nyc1-01/mysql/ |
+----------------------------+
1 row in set (0.01 sec)

Now that you’ve restarted MySQL and confirmed that it’s using the new location, take the opportunity to ensure that your database is fully functional. Once you’ve verified the integrity of any existing data, you can remove the backup data directory:

  • sudo rm -Rf /var/lib/mysql.bak

Restart MySQL one final time to be sure that it works as expected:

  • sudo systemctl restart mysql
  • sudo systemctl status mysql